
Introduction
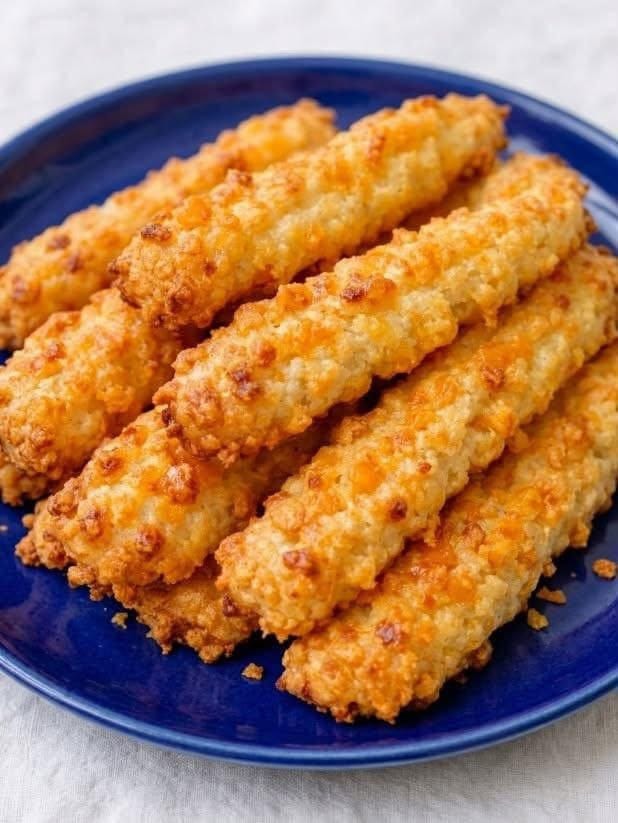
There are some snacks that just scream “Southern comfort,” and few do it with as much delightful simplicity as classic cheese straws. These crispy, savory bites are a beloved staple across the South, gracing everything from elegant cocktail parties to casual family gatherings. Imagine a golden, melt-in-your-mouth cracker, intensely flavored with sharp cheddar, offering that perfect satisfying crunch with every bite. They’re addictive in the best possible way, a true testament to how a few humble ingredients can create something truly extraordinary. While some recipes can be elaborate, we’re here to celebrate the magic of minimalism with our incredible 4-ingredient version, proving that you don’t need a pantry full of exotic items or hours in the kitchen to achieve authentic, irresistible flavor.
What makes these particular cheese straws so special, beyond their undeniable deliciousness, is their incredible ease. With just four core ingredients, you’ll be amazed at how quickly you can whip up a batch of these golden treasures. This recipe is designed for maximum flavor with minimal fuss, making it perfect for last-minute entertaining, a quick snack craving, or even as a thoughtful homemade gift. They’re savory, they’re cheesy, they’re wonderfully crisp, and they possess that unmistakable Southern charm that makes them disappear from any platter in record time. Get ready to discover your new favorite go-to appetizer that’s as simple to make as it is delightful to devour.
These 4-ingredient Southern Cheese Straws are more than just a snack; they’re a little piece of culinary history, made accessible for every home cook. The beauty lies in the quality of those few ingredients and the straightforward technique that transforms them into something truly special. Whether you’re a seasoned baker or just starting your kitchen adventures, this recipe will empower you to create a crowd-pleasing treat that tastes like it came straight from a Southern matriarch’s kitchen. Prepare to be amazed by the rich, cheesy aroma that fills your home and the satisfying crunch that will have everyone reaching for just one more.
Nutritional Information
Per serving (approximate values):
Calories: 110
Protein: 4g
Carbohydrates: 6g
Fat: 8g
Fiber: 0g
Sodium: 150mg
Ingredients
1 cup (2 sticks) unsalted butter, softened
10 ounces extra-sharp cheddar cheese, finely grated
2 cups all-purpose flour
1/2 teaspoon cayenne pepper (or to taste, optional but highly recommended for classic Southern flavor)
Instructions
Preheat your oven to 350°F (175°C). Line two large baking sheets with parchment paper.
In a large mixing bowl, combine the softened butter and finely grated cheddar cheese. Using an electric mixer on medium speed, beat until well combined and creamy, about 2-3 minutes. Make sure there are no large lumps of butter or cheese.
Gradually add the all-purpose flour to the butter and cheese mixture, mixing on low speed until just combined. The dough will be thick and somewhat crumbly at first, but continue mixing until it comes together into a cohesive, firm dough. If using, now is the time to mix in the cayenne pepper until evenly distributed. Be careful not to overmix; overworking the dough can lead to tough cheese straws.
Prepare your shaping method. For the classic ridged look, you have two main options:
Cookie Press: Load the dough into a cookie press fitted with a star-shaped disc. Press out strips of dough directly onto the prepared baking sheets, about 2-3 inches long. Leave about 1 inch of space between each straw.
Piping Bag: If you don’t have a cookie press, fit a large piping bag with a large star tip (like an Ateco 826 or Wilton 1M). Fill the bag with the dough and pipe out strips of dough onto the baking sheets, similar to the cookie press method.
Hand Rolling/Cutting (Alternative): If you don’t have a cookie press or piping bag, you can roll the dough out between two sheets of parchment paper to about 1/4-inch thickness. Then, use a knife or a fluted pastry wheel to cut the dough into strips about 1/2-inch wide and 3 inches long. You can gently press the tines of a fork along the top of each strip for a slightly textured look, though it won’t be as pronounced as with a star tip.
Bake for 15-20 minutes, or until the cheese straws are golden brown around the edges and firm to the touch. Keep a close eye on them, as oven temperatures can vary, and they can go from perfectly golden to overcooked quickly. The edges should be a deeper golden color, indicating crispness.
Once baked, remove the baking sheets from the oven and let the cheese straws cool on the sheets for about 5 minutes. They will be delicate when hot.
Carefully transfer the slightly cooled cheese straws to a wire rack to cool completely. They will crisp up further as they cool.
Serve immediately or store for later enjoyment.
Cooking Tips and Variations
To truly master these Southern 4-Ingredient Cheese Straws, a few key tips can elevate your results from good to absolutely outstanding. First and foremost, the quality of your ingredients matters immensely, especially when there are so few of them. For the cheese, always opt for a block of extra-sharp cheddar and grate it yourself. Pre-shredded cheeses often contain anti-caking agents like cellulose, which can prevent the cheese from melting properly and can affect the texture of your straws, making them less tender and more crumbly. Freshly grated cheese melts beautifully and incorporates seamlessly into the dough, yielding a richer flavor and superior texture. For the butter, ensure it’s truly softened to room temperature, but not melted. If it’s too cold, it won’t cream properly with the cheese, leading to a lumpy dough. If it’s too warm or melted, the dough can become greasy and difficult to handle.
When mixing the dough, resist the urge to overmix once the flour is added. Overworking the gluten in the flour can result in tough, dense cheese straws instead of the delicate, melt-in-your-mouth texture you’re aiming for. Mix only until the ingredients are just combined and a cohesive dough forms. The dough should be firm enough to press or pipe without being sticky. If your dough feels too soft, you can chill it in the refrigerator for 15-30 minutes; this will make it easier to handle, especially if you’re using a cookie press or piping bag, and will also help prevent the butter from melting too quickly in the oven, which can cause the straws to spread too much.
Uniformity in shape and size is crucial for even baking. Whether you’re using a cookie press, piping bag, or hand-cutting, try to make your cheese straws as consistent as possible. This ensures that they all bake at the same rate, preventing some from burning while others are still undercooked. When baking, keep a close eye on them. Cheese straws can go from perfectly golden to overly dark very quickly due to their fat content. Look for a deep golden-brown color around the edges and on the ridges, which indicates they are properly crispy and cooked through. Don’t be afraid to pull them out when they look done; they will continue to crisp up as they cool.
For variations, the simplest and most classic Southern addition is cayenne pepper. Our recipe lists it as optional, but a good pinch (or even a full 1/2 teaspoon for a noticeable kick) adds a wonderful warmth and depth of flavor that truly elevates these simple crackers. You can also experiment with other spices. A touch of smoked paprika can add a smoky undertone, while a grind of fresh black pepper can enhance the savory notes. For a herbaceous twist, finely chopped fresh rosemary or thyme can be folded into the dough. If you want to explore different cheese profiles, consider a blend of sharp cheddar with a bit of Parmesan or Gruyere for added complexity, but remember to stick to hard, grate-able cheeses for the best texture. Just ensure the total amount of cheese remains the same to maintain the dough’s consistency. You can also sprinkle a little extra grated Parmesan or a pinch of sea salt on top of the straws before baking for an extra layer of flavor and visual appeal.
Storage and Reheating
Proper storage is key to maintaining the crispness and flavor of your Southern 4-Ingredient Cheese Straws. Once completely cooled, store them in an airtight container at room temperature. They will remain fresh and crispy for up to 5-7 days. It’s important that they are fully cooled before being stored; otherwise, any residual warmth will create condensation inside the container, leading to soggy straws. For longer storage, you can freeze baked cheese straws. Arrange them in a single layer on a baking sheet and freeze until solid, then transfer them to a freezer-safe bag or container. They can be frozen for up to 2-3 months. Thaw them at room temperature before serving.
If your cheese straws have lost some of their crispness due to humidity or storage, they can easily be revived. To re-crisp, spread them in a single layer on a baking sheet and bake in a preheated oven at 300°F (150°C) for 5-10 minutes, or until they are firm and crisp again. Keep a close eye on them to prevent burning. Let them cool completely on a wire rack before serving. Reheating from frozen is also possible; simply place the frozen straws on a baking sheet and bake at 325°F (160°C) for 10-15 minutes, or until heated through and crisp, then cool on a rack.
Frequently Asked Questions
Can I make the dough ahead of time?
Absolutely! The dough for these cheese straws is perfect for making ahead. You can prepare the dough, wrap it tightly in plastic wrap, and refrigerate it for up to 3-4 days. When you’re ready to bake, let the dough sit at room temperature for about 15-20 minutes to soften slightly, making it easier to press or pipe. You can also shape the straws and then freeze them on a baking sheet until solid, then transfer to a freezer bag. Bake from frozen, adding a few extra minutes to the baking time.
Why did my cheese straws turn out crumbly or greasy?
If your cheese straws are too crumbly, it might be due to not enough mixing to bring the dough together, or your butter might have been too cold. Ensure the butter is truly softened to room temperature for proper incorporation. If they are greasy, it could be that your butter was too warm or melted when you mixed the dough, or the cheese had a very high fat content that rendered out excessively during baking. Chilling the dough before baking can help mitigate greasiness by keeping the butter solid longer in the oven.
What’s the best way to get uniform shapes?
For the most uniform shapes with the classic ridged appearance, a cookie press fitted with a star disc is your best friend. A piping bag with a large star tip is the next best option. If you’re cutting them by hand, rolling the dough to an even thickness (about 1/4 inch) and using a ruler can help ensure consistent sizes. Uniformity is key for even baking, so take a little extra time during the shaping step.
Can I use a different type of cheese?
While extra-sharp cheddar is traditional and highly recommended for its flavor and texture, you can certainly experiment. Good substitutes include other hard, sharp cheeses like Gruyere, Parmesan, or even a sharp white cheddar. Avoid very soft or high-moisture cheeses, as they can alter the dough’s consistency and the final texture of the straws. If using a different cheese, ensure it’s finely grated for best results.