
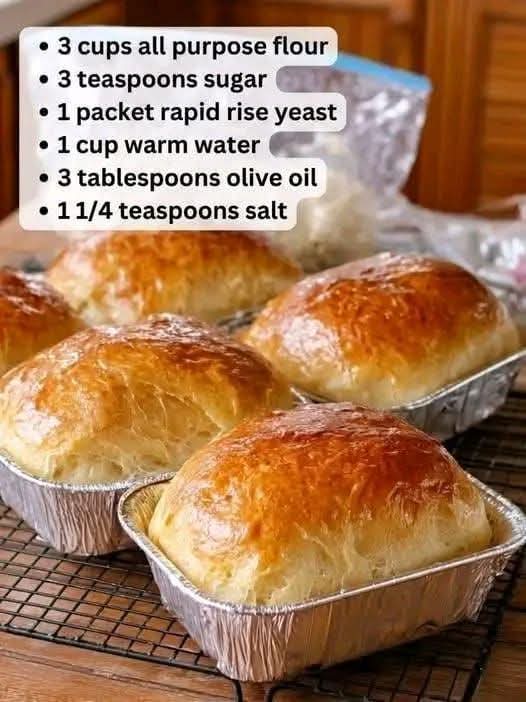
Here is a comprehensive guide and recipe based on the image you provided, expanded into a full culinary experience.
The Golden Crust: Mini Rustic Bread Loaves
Introduction
There is nothing quite like the aroma of freshly baked bread wafting through a home. It evokes warmth, comfort, and nostalgia. This recipe captures the essence of artisanal baking but simplifies it into perfect, single-serving portions using disposable aluminum tins. These Mini Golden Crust Loaves are soft, fluffy, and have a beautifully browned exterior. Whether you are a seasoned baker or a beginner, this recipe is foolproof, requiring only pantry staples. Perfect for breakfast sandwiches, dinner sides, or simply slathered in butter, these loaves are a versatile addition to any meal.
Ingredients
Based on the image provided:
· 3 cups All-purpose flour (plus extra for dusting)
· 3 teaspoons Granulated sugar
· 1 packet Rapid rise yeast (approx. 2 1/4 teaspoons)
· 1 cup Warm water (110°F – 115°F / 43°C – 46°C)
· 3 tablespoons Olive oil (plus extra for greasing)
· 1 1/4 teaspoons Salt
Optional for glaze:
· 1 egg (beaten) or melted butter for brushing
A Brief History
The concept of baking bread in small, individual tins gained massive popularity in the mid-20th century with the rise of convenience cooking. However, the method of baking enriched dough in portable vessels dates back centuries to various cultures, from English muffin tins to Chinese steam buns. This specific style—using foil pans—is a nod to modern home bakers who want the crust of a rustic loaf with the convenience of a pull-apart roll. It bridges the gap between a classic white loaf and a dinner roll.
Method & Instructions
Activation (The Bloom):
In a large mixing bowl, combine the warm water (ensure it is not too hot, or it will kill the yeast) and the sugar. Stir until the sugar dissolves. Sprinkle the rapid-rise yeast over the top. Let it sit for 5–10 minutes until the mixture becomes frothy and smells like bread. This proves the yeast is active.
Mixing the Dough:
Add the olive oil, salt, and 2 cups of the flour to the yeast mixture. Stir with a wooden spoon or dough whisk until a sticky dough forms. Gradually add the remaining 1 cup of flour, 1/4 cup at a time, until the dough pulls away from the sides of the bowl.
Kneading:
Turn the dough out onto a lightly floured surface. Knead for 8–10 minutes until the dough is smooth, elastic, and no longer sticky. (Alternatively, use a stand mixer with a dough hook on medium speed for 5–7 minutes).
First Rise (Proofing):
Lightly grease a large bowl with olive oil. Place the dough in the bowl, turning once to coat the top. Cover with a damp cloth or plastic wrap. Let it rise in a warm, draft-free place for 1 hour, or until it has doubled in size.
Shaping:
Punch down the dough to release air. Turn it out onto a floured surface. Divide the dough into 6 equal pieces (if using mini loaf tins) or 4 larger pieces. Shape each piece into a tight ball or a small log, depending on the shape of your tins.
Final Proof:
Place the shaped dough into the lightly greased aluminum foil tins. Cover them loosely with plastic wrap and let them rise for another 30–45 minutes. They should look puffy and fill the tins.
Baking:
Preheat your oven to 375°F (190°C). If desired, brush the tops of the loaves with beaten egg or melted butter for a shiny, golden crust. Bake for 18–22 minutes, or until the tops are deep golden brown and the loaves sound hollow when tapped on the bottom.
Cooling:
Remove from the oven and transfer the loaves (still in tins) to a wire rack. Let them cool for 10 minutes before removing from the tins. Serve warm.
Benefits of This Recipe
· Cost-Effective: Making bread at home costs a fraction of buying artisan loaves at a bakery.
· Control: You know exactly what is in your bread—no preservatives, dough conditioners, or excess sodium.
· Versatility: These loaves can be used for burgers, garlic bread, or sliced for toast.
· Therapeutic: Kneading dough is a proven stress reliever.
Formation & Texture
· Formation: The dough forms a gluten network during kneading, which traps the carbon dioxide produced by the yeast. This creates the airy pockets you see in the final product.
· Texture: The crumb (inside) is soft and tender due to the olive oil, while the crust is thin and slightly crisp from the direct heat of the aluminum tins.
Nutrition (Estimated per mini loaf)
Please note: Nutrition varies based on exact measurements and brands.
· Calories: ~260 kcal
· Carbohydrates: 48g
· Protein: 6g
· Fat: 8g (mostly healthy monounsaturated fats from olive oil)
· Sodium: 240mg
· Fiber: 2g
For the Lovers of Bread
For those who are passionate about baking (“Bread Lovers”), this recipe is a canvas. You can infuse the olive oil with rosemary or garlic. You can top the loaves with sesame seeds, everything bagel seasoning, or rolled oats. The aluminum tins make them excellent gifts for neighbors or friends—a personal loaf of love.
Conclusion
Baking these mini loaves is more than just following a recipe; it is an act of creation. From the simple ingredients of flour, water, yeast, and oil, you produce something nourishing and beautiful. Whether you are serving them alongside a hearty soup or using them as the foundation for a gourmet sandwich, these Golden Crust Mini Loaves are sure to become a staple in your kitchen. Enjoy the process, and even more, enjoy the result.