
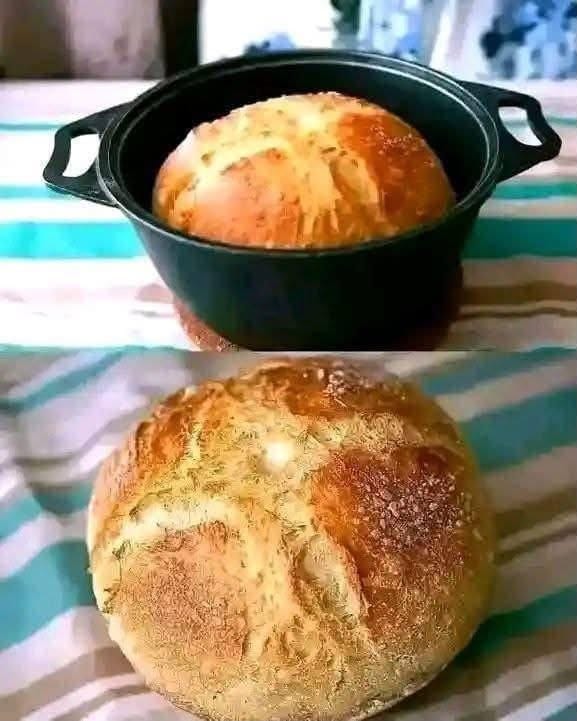
Introduction
There’s something undeniably magical about the aroma of freshly baked bread wafting through your home. It’s a scent that evokes comfort, tradition, and a sense of accomplishment. While the idea of baking artisan bread might seem daunting to some, I’m here to tell you it’s not only achievable but incredibly rewarding. Forget complicated techniques and endless kneading; this Rustic Rosemary Artisan Bread recipe delivers a bakery-quality loaf with minimal effort, making you feel like a seasoned baker in no time.
What makes this particular loaf so special? It’s a symphony of simple, honest ingredients transformed into something extraordinary. Imagine a crust that shatters with a satisfying crunch, giving way to a soft, chewy interior riddled with beautiful, airy pockets. Now, infuse that with the earthy, piney fragrance of fresh rosemary, and you have a bread that’s perfect for dipping in olive oil, slathering with butter, or serving alongside your favorite soup. The secret weapon? Your trusty Dutch oven, which creates the ideal steamy environment for maximum oven spring and that coveted crackly crust.
Whether you’re a seasoned bread maker or a curious beginner, this recipe is designed to guide you through a foolproof method for creating a truly stunning loaf. We’ll delve into the magic of the Dutch oven, the simplicity of the no-knead technique, and how a few basic ingredients can yield such incredible results. Prepare to impress yourself and everyone lucky enough to share a slice of this rustic masterpiece.
Nutritional Information
Per serving (approximate values):
Calories: 250
Protein: 9g
Carbohydrates: 48g
Fat: 2g
Fiber: 3g
Sodium: 450mg
Ingredients
3 cups (380g) all-purpose flour, plus more for dusting
1 teaspoon instant or active dry yeast
1 ½ teaspoons fine sea salt
1 ½ cups (360ml) warm water (105-115°F / 40-46°C)
2 tablespoons fresh rosemary, finely chopped (or 1 tablespoon dried rosemary)
Olive oil, for greasing the bowl
Instructions
Mix the Dough: In a large mixing bowl, combine the flour, yeast, and salt. Add the warm water and chopped rosemary. Using a wooden spoon or a sturdy spatula, mix until a shaggy, sticky dough forms and no dry spots of flour remain. Do not overmix; a few lumps are fine. The dough will be very wet and sticky – this is normal for a no-knead dough.
First Rise (Bulk Fermentation): Drizzle a little olive oil into a clean large bowl. Transfer the dough to the oiled bowl, turning it once to coat. Cover the bowl tightly with plastic wrap or a clean kitchen towel. Let the dough rise at room temperature (ideally 70-75°F / 21-24°C) for 12-18 hours, or until it has doubled in size, is bubbly, and has a pleasant yeasty aroma. The longer the rise, the more flavor the bread will develop.
Prepare for Shaping: Once the first rise is complete, lightly flour a clean work surface. Gently scrape the dough out of the bowl onto the floured surface. Avoid deflating it too much.
Shape the Dough: With floured hands, gently fold the edges of the dough towards the center, forming a somewhat round shape. Flip the dough over so the seam is on the bottom. Lightly cup your hands around the dough and gently pull it towards you, rotating it slightly, to create surface tension and form a tight ball. Avoid overworking the dough.
Second Rise (Proof): Generously flour a piece of parchment paper (about 12×12 inches). Carefully transfer the shaped dough onto the floured parchment paper, seam-side down. You can also use a floured proofing basket (banneton) if you have one. Cover the dough loosely with a clean kitchen towel or plastic wrap. Let it rest for 30-60 minutes, or until it looks slightly puffy. While the dough is proofing, proceed to the next step.
Preheat the Dutch Oven: About 30 minutes before the end of the second rise, place your Dutch oven (with its lid) in your oven. Preheat the oven to 450°F (232°C). Allow the Dutch oven to preheat for at least 30 minutes with the oven to ensure it’s scorching hot.
Score and Bake (Covered): Carefully remove the preheated Dutch oven from the oven using oven mitts. Lift the dough by the parchment paper and gently lower it into the hot Dutch oven. Be careful, as the pot is extremely hot. Using a sharp knife or a bread lame, score the top of the dough with a simple “X” or a cross-hatch pattern. This allows the bread to expand evenly. Immediately place the lid back on the Dutch oven.
Bake (Uncovered): Return the covered Dutch oven to the oven and bake for 30 minutes. After 30 minutes, carefully remove the lid. The crust should be starting to set and have a pale golden color.
Finish Baking: Continue to bake, uncovered, for another 15-20 minutes, or until the crust is a deep golden brown and sounds hollow when tapped on the bottom. The internal temperature should reach 200-210°F (93-99°C).
Cool Completely: Carefully remove the bread from the Dutch oven (using the parchment paper as handles if needed) and transfer it to a wire rack to cool completely. This is a crucial step! Resist the urge to slice into it immediately, as the internal structure is still setting, and cutting it too soon will result in a gummy interior. Let it cool for at least 1-2 hours.
Cooking Tips and Variations
Achieving artisan bread perfection is within your grasp, and a few key tips can make all the difference. Firstly, ingredient quality truly matters. While simple, using good quality all-purpose flour (unbleached is often preferred) and fresh yeast will yield superior results. Always check the expiration date on your yeast! Secondly, don’t rush the rise. The long fermentation is what develops the complex flavors and open, airy crumb characteristic of artisan bread. Room temperature plays a big role here; a cooler environment means a longer rise, and a warmer one speeds things up. Adjust your timing accordingly, observing the dough rather than strictly sticking to the clock. When handling the sticky dough, a common challenge, remember to flour your hands and work surface sparingly. Too much flour can make the bread dense. A dough scraper is an invaluable tool for releasing the dough from the bowl and gently coaxing it into shape without overworking it. Scoring the dough just before baking isn’t just for aesthetics; it provides a controlled point for the bread to expand, preventing uncontrolled tearing. A sharp knife or a bread lame held at an angle works best. Finally, and perhaps most importantly, proper cooling is essential. As tempting as it is to slice into a warm loaf, cooling allows the internal starches to set, preventing a gummy texture and ensuring that coveted crisp crust. For variations, feel free to experiment! This recipe is a fantastic base. You could swap rosemary for fresh thyme, dried oregano, or a mix of Italian herbs. For a savory kick, add 1-2 cloves of minced garlic to the dough with the rosemary. A sprinkle of shredded Parmesan or aged cheddar cheese can also be folded in during the initial mixing for a cheesy twist. For a touch of sweetness and texture, dried cranberries or walnuts would also be delicious additions.
Storage and Reheating
To keep your Rustic Rosemary Artisan Bread at its best, store it properly. For optimal freshness, once completely cooled, store the loaf at room temperature. The best way to store it is in a paper bag, which allows the crust to breathe and stay crisp for a day or two. If you prefer a softer crust or plan to keep it longer, wrap it tightly in plastic wrap or aluminum foil, or place it in an airtight bread box. Stored this way, it will remain fresh for 3-4 days. Avoid refrigerating bread, as it tends to dry out and become stale more quickly. If you want to store it for an extended period, this bread freezes beautifully. Once completely cooled, slice the loaf or wrap the whole loaf tightly in plastic wrap, then an additional layer of aluminum foil, and place it in a freezer-safe bag. It can be frozen for up to 3 months. To reheat a whole loaf, preheat your oven to 350°F (175°C). Remove the bread from the freezer and bake directly from frozen (still wrapped in foil if you want to preserve moisture, or unwrapped for a crisper crust) for 20-30 minutes, or until warmed through. If reheating slices, you can toast them in a toaster, a toaster oven, or a regular oven for a few minutes until warm and crisp. A quick refresh in a hot oven (375°F/190°C) for 5-10 minutes can bring a day-old loaf back to life, restoring some of its crustiness and warmth.
Frequently Asked Questions
My dough isn’t rising. What went wrong?
The most common reasons for dough not rising are inactive yeast or the water temperature being too hot or too cold. Ensure your yeast is fresh and active (you can test it by mixing it with a little warm water and a pinch of sugar; it should get foamy after 5-10 minutes). Also, make sure your water temperature is within the recommended range of 105-115°F (40-46°C); too hot will kill the yeast, and too cold won’t activate it.
Can I use dried rosemary instead of fresh?
Yes, you can! If using dried rosemary, use about half the amount of fresh rosemary called for in the recipe, as dried herbs are more concentrated in flavor. So, for this recipe, use 1 tablespoon of dried rosemary instead of 2 tablespoons of fresh.
My crust isn’t as crispy as I’d like. What can I do?
A super hot Dutch oven is key to a crispy crust. Make sure your Dutch oven preheats for the full 30-60 minutes with the oven. Also, ensuring the bread bakes uncovered for the last 15-20 minutes allows moisture to escape, promoting crust development. If your kitchen is very humid, this can sometimes affect crispness. Always cool the bread completely on a wire rack to prevent steam from softening the crust.
Do I really need a Dutch oven for this recipe?
While a Dutch oven is highly recommended for achieving the best results (especially the crispy crust and excellent oven spring), you can still bake this bread without one. If you don’t have a Dutch oven, you can try placing a baking stone or heavy baking sheet in your oven while it preheats to 450°F (232°C). When ready to bake, carefully transfer the dough (on parchment paper) to the hot stone/sheet. To create steam, you can place a pan of hot water on the bottom rack of your oven. Bake for 30 minutes, then remove the water pan and continue baking for another 15-20 minutes, or until golden brown. The results may vary slightly, but you’ll still get a delicious loaf.