
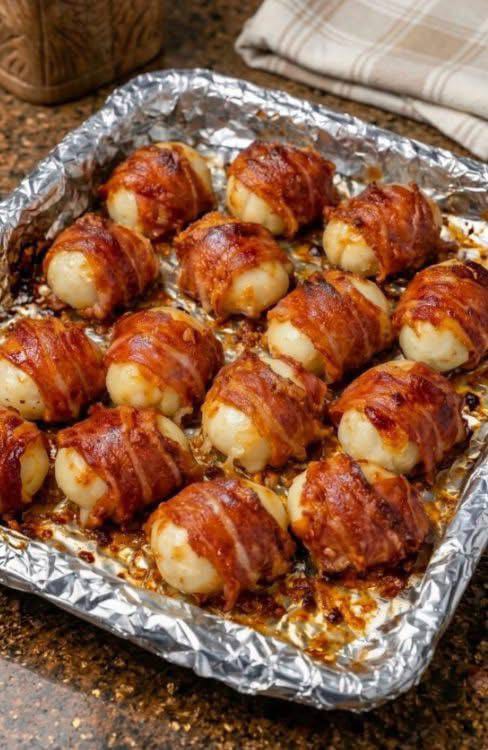
Cheddar Stuffed BBQ Bacon Bombs
Introduction
Get ready to ignite your taste buds with an appetizer that’s guaranteed to be the star of any gathering: Cheddar Stuffed BBQ Bacon Bombs! Imagine a perfect bite-sized package – crispy, smoky bacon wrapped around a tender, savory core that explodes with gooey, melted cheddar cheese, all glazed in a tangy, sweet BBQ sauce. These “bombs” are more than just a snack; they’re an experience, delivering an irresistible symphony of flavors and textures that will have everyone reaching for more.
Whether you’re hosting a game day party, planning a potluck, or simply looking for a fun and impressive appetizer to wow your family and friends, these bacon bombs hit all the right notes. They look incredibly gourmet, yet they are surprisingly simple to assemble, making them a fantastic option for both novice cooks and seasoned entertainers. The magic lies in the combination of universally loved ingredients, elevated by the art of wrapping and baking.
The beauty of these Cheddar Stuffed BBQ Bacon Bombs lies in their perfect balance. The salty crunch of the bacon, the richness of the cheddar, the hearty base, and the zesty kick of the BBQ glaze create a harmonious flavor profile that is utterly addictive. Prepare to be showered with compliments and requests for the recipe, because once you try these, there’s no going back!
Nutritional Information
Per serving (approximate values, based on 20 bombs from recipe below):
Calories: 180
Protein: 10g
Carbohydrates: 12g
Fat: 10g
Fiber: 1g
Sodium: 450mg
Ingredients
1 pound ground pork sausage (or ground beef/chicken)
1 cup shredded sharp cheddar cheese, plus 1/2 cup for topping (or 16-20 small cheddar cubes)
1/4 cup finely chopped green onions (optional)
1 teaspoon garlic powder
1/2 teaspoon onion powder
1/2 teaspoon smoked paprika
1/4 teaspoon black pepper
16-20 slices thin-cut bacon
1/2 cup your favorite BBQ sauce, plus more for serving
2 tablespoons brown sugar (optional, for extra caramelization)
Toothpicks (optional, for securing bacon)
Instructions
Preheat your oven to 375°F (190°C). Line a large baking sheet with aluminum foil for easier cleanup, and place an oven-safe wire rack on top of the foil. This helps the bacon crisp evenly.
In a large mixing bowl, combine the ground pork sausage, 1 cup shredded sharp cheddar cheese, finely chopped green onions (if using), garlic powder, onion powder, smoked paprika, and black pepper. Mix thoroughly with your hands until all ingredients are well combined. Do not overmix, as this can make the sausage tough.
Divide the sausage mixture into 16-20 equal portions. If using cheddar cubes, flatten each portion of sausage mixture into a small disc. Place one cheddar cube in the center of each disc, then carefully form the sausage mixture around the cheese cube, sealing it completely to create a ball. If using shredded cheese, simply form the sausage mixture into 16-20 balls.
Take one slice of bacon and carefully wrap it around each sausage ball, ensuring the ends of the bacon meet and overlap slightly. If the bacon doesn’t stay secure, you can use a toothpick to hold it in place. Repeat this process for all the sausage balls.
Arrange the bacon-wrapped sausage bombs on the prepared wire rack on the baking sheet, ensuring there is some space between each bomb for even cooking.
In a small bowl, whisk together the 1/2 cup BBQ sauce and 2 tablespoons brown sugar (if using). This creates a slightly thicker and sweeter glaze.
Brush about half of the BBQ sauce mixture generously over each bacon bomb.
Bake for 20-25 minutes.
Remove the baking sheet from the oven. Carefully flip each bacon bomb. Brush the remaining BBQ sauce mixture over the bombs. Sprinkle the remaining 1/2 cup shredded cheddar cheese on top of each bomb.
Return to the oven and bake for another 15-20 minutes, or until the bacon is crispy, the sausage is cooked through (internal temperature of 160°F or 71°C), and the cheese is melted and bubbly. The BBQ sauce should be caramelized and slightly sticky.
Once cooked, remove from the oven and let them rest on the wire rack for 5 minutes before serving. This allows the cheese to set slightly and prevents burns from the hot cheese. Remove any toothpicks before serving.
Serve hot, with extra BBQ sauce on the side for dipping, if desired.
Cooking Tips and Variations
To achieve perfectly crispy bacon, using thin-cut bacon is crucial. Thick-cut bacon will take much longer to crisp up, and you risk overcooking the sausage core. If you find your bacon isn’t as crisp as you’d like, you can briefly broil the bombs for 1-2 minutes at the very end, keeping a close eye on them to prevent burning. For an extra layer of crispiness and to help render fat, baking on a wire rack set over a foil-lined baking sheet is highly recommended. This allows air to circulate all around the bombs, resulting in a more even crisp.
Preventing cheese leaks is key to a successful bacon bomb. When forming the sausage mixture around the cheddar, ensure the cheese is completely encased. Any exposed cheese will melt out during baking. Chilling your cheddar cubes before stuffing can also help them hold their shape longer. If you’re using shredded cheese, make sure to compact the sausage mixture firmly around it. Don’t worry if a little cheese escapes; it just adds to the caramelized goodness on the pan!
For make-ahead convenience, you can assemble the bacon bombs up to 24 hours in advance. Prepare them through step 5 (wrapping with bacon), then place them in an airtight container or cover them loosely with plastic wrap and refrigerate. When ready to bake, remove them from the fridge about 15-20 minutes before baking to allow them to come closer to room temperature, then proceed with the baking instructions, adding a few extra minutes to the initial bake time if they are still very cold.
These bombs are fantastic on their own, but they also pair wonderfully with a variety of serving suggestions. Consider serving them with a side of ranch dressing, a spicy aioli, or even a simple green salad to cut through the richness. They are also excellent alongside other appetizers like mini corn on the cob, coleslaw, or potato salad for a full party spread. For a heartier meal, they can even be served as a unique side dish to grilled chicken or burgers.
The beauty of this recipe lies in its versatility. For flavor variations, you can experiment with different types of cheese – Monterey Jack, pepper jack for a kick, or even a smoked gouda would be delicious. Instead of ground pork sausage, you could use ground chicken or turkey for a lighter option, or even a seasoned meatloaf mixture for a richer flavor. For an extra layer of flavor, try mixing in finely diced jalapenos or a pinch of cayenne pepper into the sausage mixture. You can also play with the BBQ sauce itself, opting for a spicier, tangier, or sweeter variety. Some people like to add a dollop of cream cheese inside with the cheddar for an even creamier interior. Another idea is to wrap the sausage ball in a small biscuit dough square before wrapping with bacon for a “pigs in a blanket” style bomb.
Storage and Reheating
If you happen to have any leftover Cheddar Stuffed BBQ Bacon Bombs (a rare occurrence!), they can be stored in an airtight container in the refrigerator for up to 3-4 days. To reheat them, the best method is to use an oven or air fryer to help restore their crispiness. Preheat your oven to 350°F (175°C) or your air fryer to 325°F (160°C). Place the bombs on a baking sheet or in the air fryer basket and heat for 10-15 minutes, or until they are heated through and the bacon has re-crisped. Avoid microwaving, as this will make the bacon soggy and the cheese rubbery.
Frequently Asked Questions
Can I use thick-cut bacon for this recipe?
While you can use thick-cut bacon, it’s generally not recommended for this recipe. Thin-cut bacon crisps up much better and more evenly around the sausage ball. Thick-cut bacon can take significantly longer to cook and crisp, potentially leading to an overcooked or dry sausage interior, and it can be harder to wrap securely.
What if my cheese leaks out during baking?
A little cheese leakage is normal and can even add to the delicious caramelized bits on the pan. However, to minimize leakage, ensure that the cheese cube or shredded cheese is completely sealed within the sausage mixture before wrapping with bacon. Chilling the formed bombs for 15-20 minutes before baking can also help the cheese stay intact longer. If you use a wire rack for baking, the leaked cheese will drip onto the foil-lined pan below, keeping your bombs cleaner.
Can I make these ahead of time?
Absolutely! These Cheddar Stuffed BBQ Bacon Bombs are an excellent make-ahead appetizer. You can assemble them completely (forming the sausage balls, stuffing with cheese, and wrapping with bacon) and store them in an airtight container in the refrigerator for up to 24 hours before baking. When you’re ready to cook, let them sit at room temperature for about 15-20 minutes while your oven preheats, then proceed with the baking instructions as usual, potentially adding a few extra minutes to the initial bake time.
How do I know when the sausage is fully cooked?
The best way to ensure the sausage is fully cooked is to use a meat thermometer. Insert it into the center of one of the bombs, avoiding the cheese. Ground pork sausage should reach an internal temperature of 160°F (71°C). Visually, the sausage should no longer be pink in the center, and the bacon should be crispy and caramelized.