
Introduction
There are few aromas as comforting and inviting as that of freshly baked bread wafting through your home. It’s a scent that promises warmth, sustenance, and a touch of nostalgic simplicity. Among the vast world of bread, Amish White Bread stands out as a true classic, a testament to uncomplicated goodness. This isn’t your average supermarket loaf; it’s a soft, tender, and subtly sweet bread with a delicate crumb and a beautiful golden crust, perfect for any occasion.
What makes Amish White Bread so special? It’s its pure, unadulterated flavor and incredibly soft texture that melts in your mouth. This bread embodies the spirit of traditional Amish cooking: simple ingredients, carefully prepared, yielding outstanding results. Whether you’re looking to elevate your everyday sandwiches, craft the ultimate grilled cheese, or simply enjoy a slice warm from the oven slathered with butter, this recipe delivers. It’s designed to be approachable for even beginner bakers, offering a reliable path to homemade bread success.
Forget store-bought loaves and embrace the joy of baking your own. This recipe for Amish White Bread will guide you through each step, ensuring a delicious outcome that will impress your family and friends. Get ready to fill your kitchen with that irresistible aroma and savor the unparalleled taste of bread made with love and care.
Nutritional Information
Per serving (approximate values, based on 20 servings per loaf for 2 loaves):
Calories: 150-180
Protein: 4-5g
Carbohydrates: 28-32g
Fat: 3-4g
Fiber: 1-2g
Sodium: 180-220mg
Ingredients
2 cups (480ml) warm milk (105-115°F / 40-46°C)
1/2 cup (120ml) warm water (105-115°F / 40-46°C)
2 1/4 teaspoons (1 packet) active dry yeast
1/2 cup (100g) granulated sugar, divided
1/4 cup (56g) unsalted butter, melted, plus more for greasing pans and brushing
1 tablespoon salt
6-7 cups (720-840g) all-purpose flour, plus more for dusting
Instructions
In a large mixing bowl or the bowl of a stand mixer, combine the warm milk and warm water. Sprinkle the active dry yeast over the liquid, along with 1 tablespoon of the granulated sugar. Stir gently and let sit for 5-10 minutes, or until the mixture becomes foamy. This indicates that the yeast is active.
Once the yeast is foamy, add the remaining 7 tablespoons of granulated sugar, the melted butter, and the salt to the bowl. Stir well to combine.
Gradually add 3 cups of the all-purpose flour, one cup at a time, mixing with a wooden spoon or on low speed with a stand mixer until just combined and smooth.
Continue adding the remaining flour, 1/2 cup at a time, mixing until a shaggy dough forms. Once the dough starts to pull away from the sides of the bowl, turn it out onto a lightly floured surface.
Knead the dough by hand for 8-10 minutes, or use a stand mixer with the dough hook attachment on medium-low speed for 6-8 minutes. Knead until the dough is smooth, elastic, and no longer sticky. It should spring back when gently poked. Add a little more flour if necessary, but be careful not to add too much, as this can result in a dry loaf.
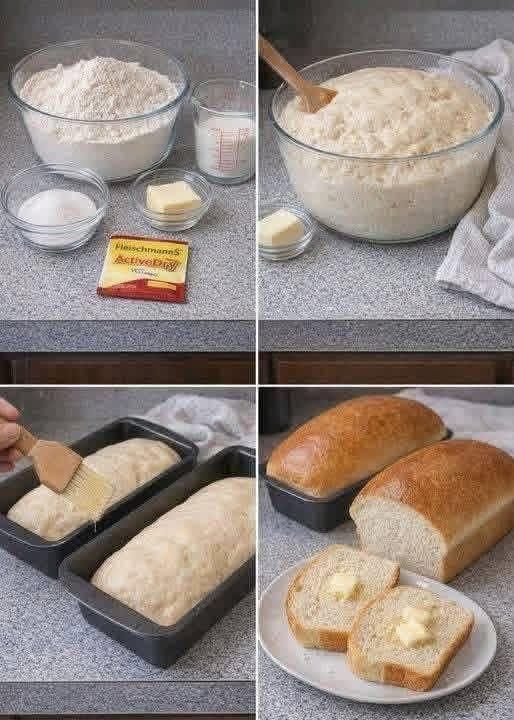
Lightly grease a large clean bowl with butter or cooking spray. Place the kneaded dough in the bowl, turning it once to coat the top. Cover the bowl tightly with plastic wrap or a clean kitchen towel.
Place the bowl in a warm, draft-free place to rise for 1 to 1 1/2 hours, or until the dough has doubled in size. A good spot is an oven with just the light on (not preheated), or a microwave that is turned off.
Once the dough has doubled, gently punch it down to release the air. Turn the dough out onto a lightly floured surface and divide it in half.
For each half, gently flatten the dough into a rectangle. Starting from one of the longer sides, tightly roll the dough into a log. Pinch the seam closed firmly with your fingers. Tuck the ends under to create a neat loaf shape.
Lightly grease two 9×5-inch loaf pans with butter or cooking spray. Place one shaped loaf into each prepared pan, seam-side down.
Cover the loaf pans loosely with plastic wrap or a clean kitchen towel. Return them to your warm, draft-free spot for a second rise, for another 30-45 minutes, or until the loaves have nearly doubled in size and are puffy.
About 15 minutes before the end of the second rise, preheat your oven to 375°F (190°C).
Once the loaves have risen, remove the cover and place them in the preheated oven.
Bake for 30-35 minutes, or until the crust is golden brown and the internal temperature of the bread reaches 200-210°F (93-99°C) when measured with an instant-read thermometer.
Carefully remove the bread from the oven. If desired, immediately brush the tops of the hot loaves with a little melted butter. This will give them a softer crust and a beautiful sheen.
Let the loaves cool in the pans for 5-10 minutes before carefully turning them out onto a wire rack to cool completely. Slicing warm bread can sometimes make it gummy, so patience is key for the best texture.
Cooking Tips and Variations
To ensure your Amish White Bread turns out perfectly every time, here are some essential tips and exciting variations to try:
Yeast Activation is Key: Always ensure your water and milk are within the specified temperature range (105-115°F / 40-46°C). Water that is too hot will kill the yeast, preventing your bread from rising. Water that is too cold will not activate it properly, leading to a sluggish rise. If your yeast doesn’t foam after 5-10 minutes, your yeast might be old or the temperature was off; it’s best to start over with fresh yeast.
Don’t Over-Flour: It’s tempting to keep adding flour if your dough feels sticky, but too much flour will result in a dense, dry loaf. Add flour gradually until the dough is smooth and elastic but still slightly tacky. The dough should pull away from the sides of the bowl when kneading.
The Kneading Test: Proper kneading develops the gluten, which gives bread its structure and chewiness. To test if your dough is sufficiently kneaded, perform the “windowpane test.” Pinch off a small piece of dough and gently stretch it. If you can stretch it thin enough to see light through it without it tearing, your gluten is well-developed.
Warm Rising Environment: Yeast loves warmth! For a consistent and successful rise, find a warm, draft-free spot. Besides the oven with the light on, other good options include a microwave (turned off), a sunny windowsill (if not too cold), or even placing the bowl near a warm appliance.
Internal Temperature for Doneness: The best way to know if your bread is fully baked is to check its internal temperature with an instant-read thermometer. It should register between 200-210°F (93-99°C). This ensures the crumb is cooked through and not doughy.
Brushing for a Soft Crust: Brushing the hot loaves with melted butter immediately after removing them from the oven not only adds a lovely sheen but also helps to soften the crust, making it more tender and enjoyable.
Cool Completely: While it’s hard to resist, allowing the bread to cool completely on a wire rack is crucial. This allows the internal structure of the bread to set and prevents a gummy texture when sliced.
Variations to Experiment With:
Honey Sweetness: For a richer, more nuanced sweetness, substitute half or all of the granulated sugar with honey. This will also give the bread a slightly different flavor profile and a beautiful golden hue.
Whole Wheat Blend: If you prefer a slightly heartier loaf, you can substitute 1-2 cups of the all-purpose flour with whole wheat flour. Start with 1 cup and see how you like the texture. Keep in mind that whole wheat flour absorbs more liquid, so you might need to add a touch more milk or water.
Herb Infusion: For a savory twist, knead in 1-2 tablespoons of dried herbs like rosemary, thyme, or Italian seasoning during the last few minutes of kneading. This makes a fantastic bread for serving with soups or stews.
Cinnamon Swirl: After the first rise, roll out each dough half into a rectangle. Spread a thin layer of softened butter, then sprinkle with a mixture of cinnamon and sugar (about 1 tablespoon cinnamon to 1/4 cup sugar). Roll it up tightly and proceed with shaping and baking.
Milk Wash for Shine: Instead of brushing with melted butter after baking, you can brush the tops of the loaves with a little milk before baking for a slightly softer crust and a subtle sheen.
Storage and Reheating
Proper storage is essential to keeping your homemade Amish White Bread fresh and delicious for as long as possible. Reheating correctly can bring back that wonderful warmth and tenderness.
Countertop Storage: Once completely cooled, store the bread in an airtight container, a bread box, or a large resealable plastic bag at room temperature. This will keep it fresh for 3-5 days. Avoid storing in the refrigerator, as it can cause bread to stale faster.
Freezing for Longer Storage: For longer storage, slice the cooled bread and place the slices in a single layer on a baking sheet to freeze for about an hour. Once firm, transfer the slices to a freezer-safe bag or container, removing as much air as possible. You can also freeze whole loaves, tightly wrapped in plastic wrap and then aluminum foil. Frozen bread will keep well for up to 3 months.
Thawing Frozen Bread: To thaw slices, simply take out what you need and let them come to room temperature on the counter, or toast them directly from frozen. For a whole loaf, thaw overnight in the refrigerator or on the counter.
Reheating a Whole Loaf: To revive a slightly stale or thawed whole loaf, preheat your oven to 350°F (175°C). Lightly spritz the loaf with water (or wrap loosely in foil if it’s very dry) and bake for 10-15 minutes, or until warmed through and the crust is crisp again.
Reheating Slices: Individual slices can be reheated in a toaster, toaster oven, or even a microwave (though the microwave can make them a bit chewy). For best results, a toaster or oven is recommended.
Frequently Asked Questions
Why didn’t my bread rise?
There are a few common culprits for bread not rising. The most frequent reason is inactive yeast. Ensure your warm liquid (milk and water) is between 105-115°F (40-46°C); too hot will kill the yeast, too cold won’t activate it. Also, check the expiration date on your yeast. Other factors include not enough kneading (which develops gluten for structure) or a cold, drafty rising environment.
Can I make this bread by hand without a stand mixer?
Absolutely! This recipe is very adaptable to hand kneading. The kneading time by hand will be slightly longer, typically 8-10 minutes, to achieve the smooth, elastic dough consistency. Just ensure you have a lightly floured surface and put some elbow grease into it!
Why is my bread dense?
Dense bread is often a result of too much flour or not enough kneading. Adding too much flour makes the dough stiff and heavy, preventing it from rising properly. Insufficient kneading means the gluten hasn’t developed enough to trap the gases produced by the yeast, leading to a tight, dense crumb. Ensure you add flour gradually and knead until the dough passes the windowpane test.
How can I get a softer crust?
To achieve a super soft crust, brush the tops of the hot loaves with melted butter immediately after they come out of the oven. This creates a barrier that keeps moisture in and prevents the crust from hardening as it cools. You can also cover the hot loaves with a clean kitchen towel while they cool, which helps to trap steam and soften the crust.