
Introduction
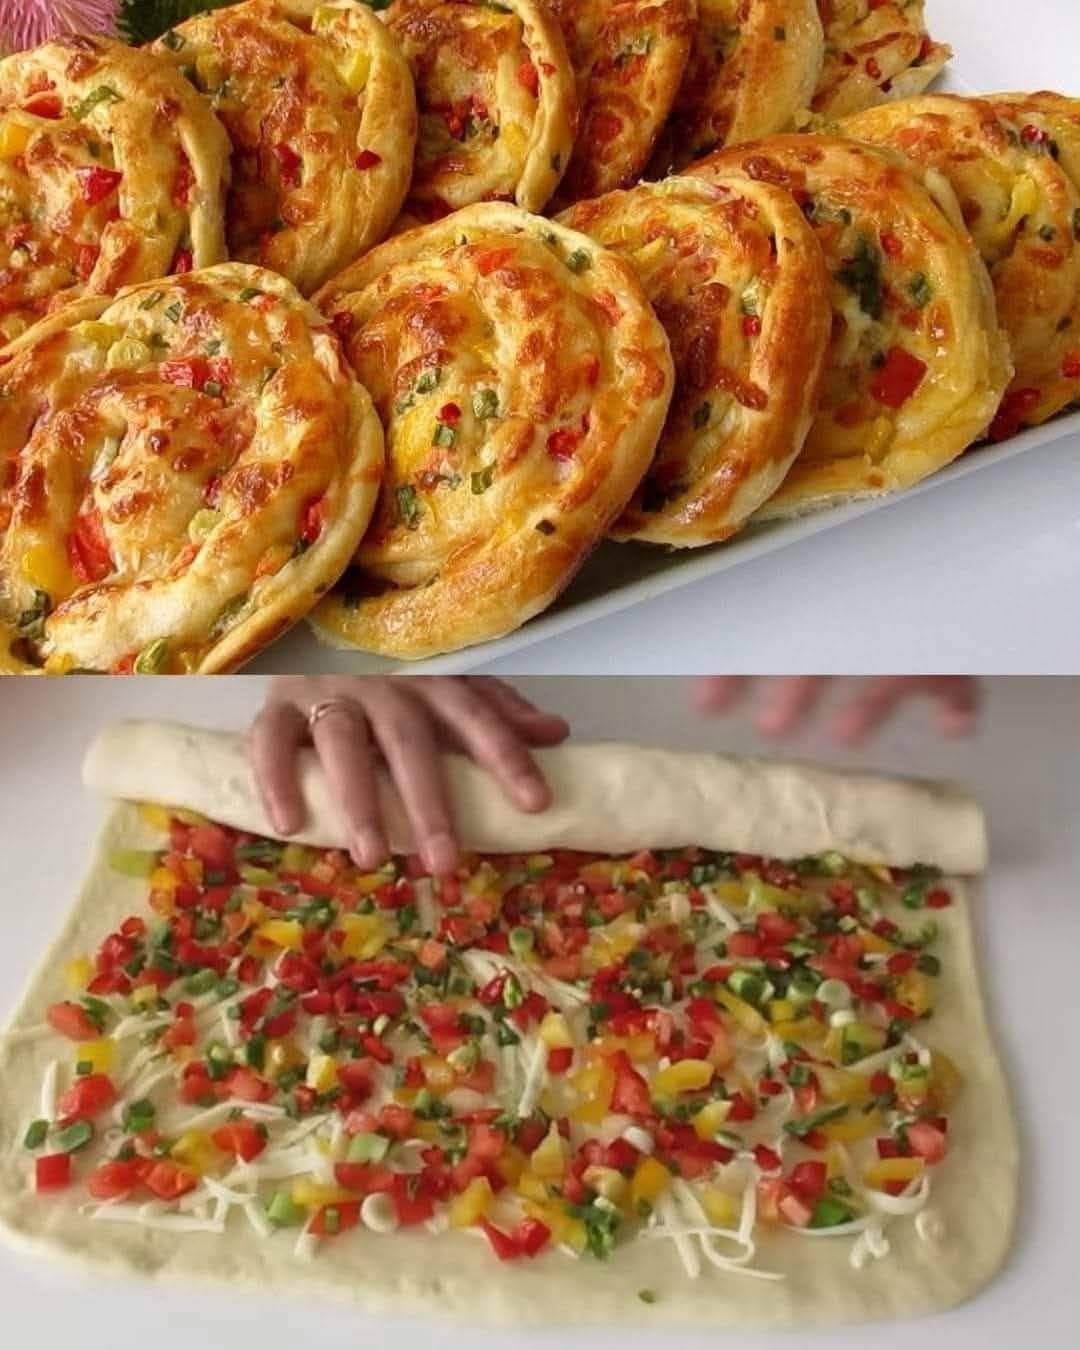
Forget everything you thought you knew about cheesecake! While our title might playfully suggest a sweet, creamy dessert, prepare to embark on a delightful culinary journey into the world of savory indulgence. This isn’t your grandma’s cheesecake; it’s a vibrant, cheesy, vegetable-packed sensation that will redefine your snack game. Imagine soft, fluffy dough generously swirled with a medley of colorful, finely diced vegetables and gooey, melted cheese, all baked to golden perfection. These savory vegetable and cheese swirls are an absolute feast for the eyes and the palate, offering a perfect blend of fresh flavors and comforting textures that make them irresistible.
These delightful swirls are the ultimate chameleon of the snack world, effortlessly fitting into almost any occasion. Whether you’re hosting a lively brunch, packing a sophisticated lunchbox, seeking a light and satisfying dinner, or simply need an impressive appetizer for your next gathering, these savory treats deliver. Their visually appealing spiral pattern, bursting with hues of red, yellow, and green bell peppers, alongside juicy tomatoes and stretchy mozzarella, makes them an instant showstopper. They’re a fantastic way to sneak in extra vegetables, and their cheesy goodness ensures even the pickiest eaters will ask for more. Plus, the process of making them is surprisingly therapeutic and rewarding, yielding a batch of mouthwatering morsels that are far more exciting than your average finger food.
What truly sets these savory swirls apart is their incredible versatility and the sheer joy they bring to the table. The soft, slightly enriched yeast dough provides the perfect canvas for a rich, flavorful filling. Each bite offers a harmonious balance of tender dough, crisp-tender vegetables, and the comforting pull of melted cheese. They are designed to be enjoyed warm, straight from the oven, when the cheese is at its most molten and the aromas are intoxicating, but they’re equally delicious at room temperature, making them ideal for picnics and potlucks. Get ready to impress your friends and family with this unexpectedly savory, utterly delicious, and incredibly satisfying “cheesecake” that promises to be a delicious snack for any occasion!
Nutritional Information
Per serving (approximate values):
Calories: 280
Protein: 12g
Carbohydrates: 35g
Fat: 10g
Fiber: 3g
Sodium: 350mg
Ingredients
2 ¼ teaspoons active dry yeast (or 1 packet)
1 teaspoon granulated sugar
1 cup warm milk (105-115°F / 40-46°C)
3 cups all-purpose flour, plus more for dusting
1 teaspoon salt
¼ cup olive oil, plus 1 tablespoon for brushing
1 ½ cups shredded mozzarella cheese
½ cup finely diced red bell pepper
½ cup finely diced yellow bell pepper
½ cup finely diced green bell pepper
½ cup finely diced ripe tomatoes (e.g., Roma or cherry tomatoes)
½ teaspoon garlic powder (optional)
½ teaspoon onion powder (optional)
¼ teaspoon dried oregano (optional)
1 large egg, for egg wash
1 tablespoon water, for egg wash
Instructions
Activate the Yeast: In a large bowl or the bowl of a stand mixer, combine the warm milk and granulated sugar. Sprinkle the active dry yeast over the top. Let it sit for 5-10 minutes, until the mixture is foamy, indicating the yeast is active. If it doesn’t foam, your yeast might be old or the milk wasn’t the right temperature; start again with fresh yeast.
Prepare the Dough: To the yeast mixture, add 3 cups of all-purpose flour, 1 teaspoon of salt, and ¼ cup of olive oil. If using a stand mixer, attach the dough hook and mix on low speed for 8-10 minutes until the dough is smooth, elastic, and pulls away from the sides of the bowl. If kneading by hand, mix with a wooden spoon until a shaggy dough forms, then turn it out onto a lightly floured surface and knead for 10-12 minutes until smooth and elastic.
First Rise (Proofing): Lightly grease a clean large bowl with a little olive oil. Place the dough in the bowl, turning it once to coat. Cover the bowl with plastic wrap or a clean kitchen towel and let it rise in a warm, draft-free place for 1 to 1.5 hours, or until doubled in size.
Prepare the Filling: While the dough is rising, prepare the vegetable filling. Finely dice the red, yellow, and green bell peppers, and the tomatoes. Ensure all vegetables are diced uniformly and quite small, about ¼-inch pieces, to prevent tearing the dough and ensure even cooking. In a medium bowl, combine the shredded mozzarella cheese, diced bell peppers, and diced tomatoes. If desired, stir in the optional garlic powder, onion powder, and dried oregano for extra flavor.
Roll Out the Dough: Once the dough has doubled, gently punch it down to release the air. Turn the dough out onto a lightly floured surface. Using a rolling pin, roll the dough into a large rectangle, approximately 12×18 inches (30×45 cm) and about ¼-inch thick. Try to keep the edges as straight as possible.
Spread the Filling: Evenly spread the vegetable and cheese mixture over the entire surface of the rolled-out dough, leaving a small ½-inch border along one of the longer edges uncovered. Gently press the filling into the dough to help it adhere.
Roll the Dough: Starting from the longer edge opposite the uncovered border, tightly roll the dough into a log. Roll it as tightly as possible to ensure well-defined swirls and prevent the filling from escaping during baking. Pinch the seam closed to seal the log.
Slice the Swirls: Using a sharp knife, a serrated knife, or even unflavored dental floss, cut the log into 12-15 equal slices, each about 1 to 1.5 inches thick. If using dental floss, slide it under the log, cross the ends over the top, and pull to cut cleanly.
Arrange for Second Rise: Lightly grease a large baking sheet or line it with parchment paper. Arrange the sliced swirls on the prepared baking sheet, leaving about 1 inch of space between each. They will expand as they rise and bake.
Second Rise (Proofing): Cover the baking sheet loosely with plastic wrap or a clean kitchen towel. Let the swirls rise again in a warm place for 30-45 minutes, or until visibly puffy.
Preheat Oven and Prepare Egg Wash: While the swirls are undergoing their second rise, preheat your oven to 375°F (190°C). In a small bowl, whisk together the egg and 1 tablespoon of water to create an egg wash.
Bake the Swirls: Gently brush the tops and sides of the risen swirls with the egg wash. This will give them a beautiful golden-brown color and a slight sheen. Bake for 20-25 minutes, or until the swirls are golden brown on top, the cheese is bubbly, and they are cooked through.
Cool and Serve: Remove the baking sheet from the oven and let the savory swirls cool on the sheet for 5-10 minutes before transferring them to a wire rack. They are best served warm, when the cheese is still soft and gooey.
Cooking Tips and Variations
Achieving perfectly tender, flavorful savory swirls is all about attention to detail and a willingness to experiment. Here are some essential tips to ensure your baking success and ideas for customizing this versatile recipe.
Tips for Best Results:
Finely Dice Your Vegetables: This is crucial for a few reasons. Small, uniform pieces (about ¼-inch) ensure that the vegetables cook evenly and quickly within the baking time. They also integrate better into the filling, making the log easier to roll and preventing the dough from tearing. Large chunks can create air pockets, making the swirls less compact and potentially leading to a soggy interior.
Don’t Overfill: While it’s tempting to load up on the delicious filling, too much can make the dough difficult to roll tightly. It can also cause the swirls to unravel or the filling to ooze out excessively during baking. Aim for an even, generous layer without piling it too high.
Roll Tightly: When forming the log, roll the dough as tightly as possible from one end to the other. A tight roll is key to creating those beautiful, distinct spiral layers and ensures the swirls hold their shape well. If the roll is too loose, the swirls might fall apart or have large gaps.
Use a Sharp Knife or Dental Floss for Slicing: For clean, even cuts that maintain the integrity of the swirls, a very sharp chef’s knife or a serrated knife works wonders. Alternatively, unflavored dental floss is a fantastic trick: slide it under the log, cross the ends over the top, and pull to slice through without squishing the dough or displacing the filling.
Proper Proofing: Don’t rush the rising times. The first rise develops flavor and texture, while the second rise ensures light and airy swirls. A warm, draft-free environment is ideal for both rises. If your kitchen is cool, you can place the bowl or baking sheet in a turned-off oven with the light on (the residual heat from the bulb provides warmth).
Don’t Over-Flour When Rolling: Use just enough flour to prevent sticking. Too much flour can make the dough tough and dry, affecting the final texture of your swirls.
Egg Wash for Golden Finish: Brushing with an egg wash (egg whisked with a tablespoon of water or milk) before baking gives the swirls a beautiful golden-brown color and a lovely subtle sheen, making them even more appealing.
Recipe Variations:
Cheese Choices: While mozzarella is a classic for its meltiness, feel free to experiment! Try a blend of mozzarella and sharp cheddar for more flavor, or add some grated Parmesan for a salty, nutty kick. Provolone, Gruyere, or even a little crumbled feta can also be delicious additions.
Vegetable Medley: The beauty of this recipe is its adaptability. Beyond bell peppers and tomatoes, consider adding:
Sautéed mushrooms (ensure they are well-drained to avoid excess moisture)
Finely chopped spinach or kale (sautéed and squeezed dry)
Sweet corn kernels (fresh or frozen, thawed)
Diced zucchini or yellow squash
Thinly sliced black olives or green olives
A touch of finely minced fresh jalapeño for a mild kick.
Remember to keep vegetable pieces small and relatively dry.
Herb & Spice Boost: Enhance the flavor profile with different herbs and spices.
Italian Flair: Increase oregano, add dried basil, a pinch of red pepper flakes.
Mediterranean Touch: Incorporate dried thyme, a sprinkle of za’atar.
Smoky Kick: Add smoked paprika to the filling.
Garlic & Onion: Don’t hesitate to use fresh minced garlic or finely chopped green onions in addition to (or instead of) the powders.
Protein Power (Non-Vegetarian Option): For those who enjoy meat, these swirls can easily accommodate cooked, finely diced ham, crumbled cooked sausage, or even mini pepperoni slices. Ensure any meat additions are fully cooked and excess fat is drained.
Dough Variations: While an enriched yeast dough is fantastic, you could also experiment with a whole wheat flour blend (using up to 50% whole wheat flour) for a nuttier flavor and added fiber, though it might result in a slightly denser swirl.
Sweet & Savory Glaze (Post-Bake): For an extra layer of flavor, once cooled slightly, you could lightly brush the warm swirls with a very thin glaze made from olive oil, minced garlic, and fresh chopped parsley.
By following these tips and exploring the variations, you can customize these savory vegetable and cheese swirls to perfectly suit your taste and impress any crowd!
Storage and Reheating
These savory vegetable and cheese swirls are best enjoyed fresh from the oven, but they store and reheat remarkably well, making them perfect for meal prep or enjoying leftovers throughout the week.
Storage:
Room Temperature: If you plan to consume them within a few hours, the swirls can be left covered at room temperature. However, due to the cheese and fresh vegetables, it’s generally best to refrigerate them if storing for longer.
Refrigerator: Once completely cooled, place the swirls in an airtight container. They will stay fresh in the refrigerator for up to 3-4 days. Storing them in an airtight container prevents them from drying out and absorbing odors from other foods.
Freezer (Unbaked): If you want to prepare ahead, you can freeze the unbaked swirls. After slicing the log into individual swirls and arranging them on a baking sheet, place the entire sheet in the freezer. Once the swirls are solid (about 1-2 hours), transfer them to a freezer-safe bag or container, separating layers with parchment paper. They can be frozen for up to 1 month. When ready to bake, place frozen swirls on a baking sheet, cover loosely, and let them thaw and rise in a warm place for 2-3 hours (or overnight in the fridge) before baking as directed, possibly adding a few extra minutes to the baking time.
Freezer (Baked): Fully baked and cooled swirls can also be frozen. Wrap individual swirls tightly in plastic wrap, then place them in a freezer-safe bag or container. They will keep well for up to 1-2 months. Freezing them individually allows you to take out just what you need.
Reheating:
Oven/Toaster Oven (Recommended): This method is best for restoring a crispy exterior and gooey interior.
Preheat your oven or toaster oven to 300-325°F (150-160°C).
Place the swirls directly on a baking sheet.
Heat for 8-12 minutes, or until warmed through and the cheese is melted and bubbly again. If reheating from frozen, it might take 15-20 minutes.
Microwave (Quickest, but softer texture): For a quick reheat, the microwave works, but the swirls will be softer and won’t have the same crispness.
Place one or two swirls on a microwave-safe plate.
Heat on medium power for 20-40 seconds, or until heated through. Be careful not to overheat, as this can make them tough.
Air Fryer: An air fryer can also provide a good crisp texture.
Preheat your air fryer to 300°F (150°C).
Place swirls in a single layer in the air fryer basket.
Heat for 3-5 minutes, checking periodically, until warmed through and slightly crispy.
No matter how you store and reheat them, these savory swirls remain a delightful treat, ready to be enjoyed whenever a craving strikes!
Frequently Asked Questions
Can I make the dough ahead of time?
Absolutely! You can prepare the dough up to step 3 (after the first rise). After the dough has doubled in size, punch it down, cover it tightly with plastic wrap, and refrigerate it for up to 24 hours. When you’re ready to use it, let it sit at room temperature for about 30 minutes to an hour to take the chill off before rolling it out and proceeding with the recipe. This makes it perfect for preparing the day before a party or busy morning.
My swirls are unraveling during baking. What went wrong?
This usually indicates that the dough wasn’t rolled tightly enough into a log, or the seam wasn’t pinched securely closed. Ensure you roll the dough very snugly, pressing out any air as you go. Also, firmly pinch the final seam along the length of the log to seal it completely. Sometimes, using too much filling can also contribute to unraveling, so ensure the filling is spread evenly and not overpacked.
Can I use different vegetables in the filling?
Yes, this recipe is incredibly versatile! Feel free to customize the vegetable filling based on your preferences or what you have on hand. Good options include finely chopped spinach (sautéed and squeezed dry), mushrooms (sautéed and well-drained), zucchini, corn, or even finely minced olives. The key is to ensure the vegetables are finely diced and any high-moisture vegetables are pre-cooked and drained to prevent the swirls from becoming soggy. Always aim for a colorful mix for visual appeal and balanced flavor.
Why are my swirls dry or tough?
Dry or tough swirls can often be attributed to a few factors. One common culprit is adding too much flour during the kneading or rolling process; always use just enough to prevent sticking. Over-kneading the dough can also develop too much gluten, leading to a tough texture. Finally, over-baking can dry out the swirls, so keep an eye on them and remove them from the oven as soon as they are golden brown and cooked through, usually around the 20-25 minute mark.