Why You’ll Love This Recipe
There’s so much to adore about No-Bake Fairy Bread Slice. Here’s why it’s a must-try:
No-Bake Simplicity : No oven required—just mix, layer, and chill!
Whimsical and Fun : The rainbow sprinkles make it a magical treat for kids and adults alike.
Quick and Easy : Ready in under 30 minutes (plus chilling time).
Customizable : Add your favorite candies, nuts, or flavors to make it your own.
Crowd-Pleasing : Whether you’re feeding family, friends, or party guests, everyone will love this colorful creation.
Ingredients You’ll Need
The secret to this slice lies in its simple yet indulgent layers. Here’s what you’ll need:
For the Base:
2 cups crushed digestive biscuits (or graham crackers)
1/4 cup granulated sugar
1/2 cup unsalted butter (melted)
For the Filling:
1 can (14 oz) sweetened condensed milk
1 teaspoon vanilla extract
2 cups shredded coconut
1/2 cup rainbow sprinkles (plus extra for topping)
Optional Toppings:
White chocolate drizzle
Extra sprinkles
Edible glitter (for extra sparkle!)
Step-by-Step Instructions
Ready to whip up this magical, no-bake delight? Follow these easy steps:
Step 1: Prepare the Base
In a mixing bowl, combine the crushed biscuits, sugar, and melted butter until the mixture resembles wet sand.
Press the mixture firmly into the base of a lined 8x8-inch square pan. Use the back of a spoon or your hands to smooth it out evenly.
Place the pan in the refrigerator while you prepare the filling.
Step 2: Make the Filling
In a large mixing bowl, combine the sweetened condensed milk, vanilla extract, shredded coconut, and sprinkles. Stir until well combined and the mixture is sticky.
Remove the pan from the refrigerator and spread the coconut mixture evenly over the biscuit base, pressing it down gently to ensure it sticks.
Step 3: Add the Sprinkle Topping
Sprinkle an additional layer of rainbow sprinkles over the top of the slice for extra color and texture.
If desired, drizzle melted white chocolate over the top for a decorative finish.
Step 4: Chill and Set
Place the pan in the refrigerator for at least 2–3 hours , or until the slice is firm and set.
Once chilled, use the parchment paper overhang to lift the slice out of the pan and transfer it to a cutting board.
Step 5: Cut and Serve
Cut the slice into squares or rectangles using a sharp knife. Wipe the knife clean between cuts for neat edges.
Serve chilled or at room temperature, and watch the smiles light up as everyone digs in!
Why This Recipe Works So Well
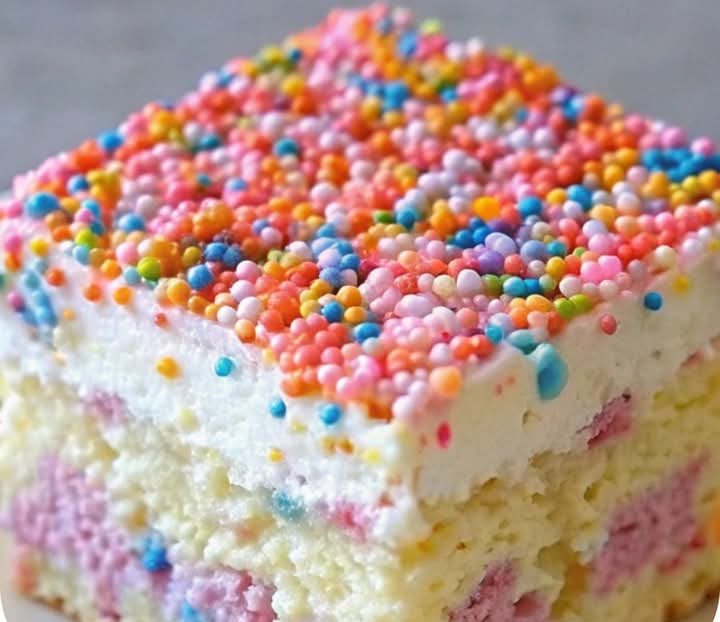
The magic of No-Bake Fairy Bread Slice lies in its simplicity and playful presentation. The buttery biscuit base provides a sturdy foundation, while the creamy coconut filling adds sweetness and texture. The rainbow sprinkles bring joy and nostalgia, making this slice a celebration-worthy treat that’s perfect for any occasion. Together, these elements create a dessert that’s as delightful to look at as it is to eat—a true showstopper.
Variations to Try
While the classic version is divine, here are some creative ways to switch things up:
Add Chocolate : Mix chocolate chips into the filling or drizzle melted dark chocolate over the top.
Make It Nutty : Stir in chopped nuts like almonds, pistachios, or hazelnuts for added crunch.
Vegan Option : Use dairy-free butter, sweetened condensed coconut milk, and vegan sprinkles for a plant-based version.
Gluten-Free Option : Substitute gluten-free cookies or crackers for the base.
Festive Themes : Match the sprinkles to holidays or events—pastels for Easter, red and green for Christmas, or team colors for game day.
Tips for Success
Crush the Biscuits Finely : Use a food processor or place the biscuits in a zip-top bag and crush them with a rolling pin for a consistent texture.
Press Firmly : Ensure the base is pressed down tightly to prevent crumbling when sliced.
Chill Thoroughly : Allow enough time for the slice to set in the refrigerator for clean, neat cuts.
Save Leftovers : Store the slice in an airtight container in the refrigerator for up to 5 days.
Freeze for Later : Wrap individual pieces in plastic wrap and freeze for up to 1 month. Thaw at room temperature before serving.
Serving Suggestions
This No-Bake Fairy Bread Slice is incredibly versatile and pairs well with a variety of occasions. Here are some ideas to enhance your experience:
Kids’ Parties : Include it on a dessert table alongside cupcakes, cookies, and other treats.
School Lunches : Cut into bite-sized pieces for a fun and portable snack.
Holiday Spread : Match the sprinkles to the season for a festive touch.
Gift Idea : Package slices in decorative boxes or cellophane bags tied with ribbon for thoughtful homemade gifts.
Brunch Twist : Serve it alongside fruit platters, yogurt parfaits, and fresh juice for a sweet brunch addition.
Final Thoughts
With its buttery base, creamy filling, and rainbow sprinkle topping, No-Bake Fairy Bread Slice is a treat worth making again and again. Whether you’re hosting a gathering, celebrating a special occasion, or simply craving something sweet and whimsical, this recipe delivers big on taste and charm.
So, the next time you’re in the mood for something colorful, magical, and utterly delicious, give this slice a try. Trust us—it’s quick, easy, and absolutely divine!
Have you tried this recipe yet? Share your thoughts, tips, and variations in the comments below. Happy baking (and sprinkling)!